In this video tutorial I am going to share with you how to display user’s current location on a MapView programmatically as well as how to create MapView using Xcode Storyboard. We will also learn how to drop a Pin(MKPointAnnotation) at user’s current location and set MKPointAnnotation custom title.
For your application to be able to determine user’s current location, we will need to update project’s info.plist file.
Update Info.plist file
For your app to be able to request user’s current location, you will need to open Info.plist file as Source Code and add the following two new keys and corresponding values:
    NSLocationAlwaysUsageDescription
    Will you allow this app to always know your location?
    NSLocationWhenInUseUsageDescription
    Do you allow this app to know your current location?
Display User’s Current Location on a MapView. Complete Source Code in Swift.
import UIKit
import CoreLocation
import MapKit
class ViewController: UIViewController, MKMapViewDelegate, CLLocationManagerDelegate {
var locationManager:CLLocationManager!
var mapView:MKMapView!
override func viewDidLoad() {
super.viewDidLoad()
// Do any additional setup after loading the view, typically from a nib.
}
override func didReceiveMemoryWarning() {
super.didReceiveMemoryWarning()
// Dispose of any resources that can be recreated.
}
override func viewWillAppear(animated: Bool) {
super.viewWillAppear(animated)
// Create and Add MapView to our main view
createMapView()
}
override func viewDidAppear(animated: Bool) {
super.viewDidAppear(animated)
determineCurrentLocation()
}
func createMapView()
{
mapView = MKMapView()
let leftMargin:CGFloat = 10
let topMargin:CGFloat = 60
let mapWidth:CGFloat = view.frame.size.width-20
let mapHeight:CGFloat = 300
mapView.frame = CGRectMake(leftMargin, topMargin, mapWidth, mapHeight)
mapView.mapType = MKMapType.Standard
mapView.zoomEnabled = true
mapView.scrollEnabled = true
// Or, if needed, we can position map in the center of the view
mapView.center = view.center
view.addSubview(mapView)
}
func determineCurrentLocation()
{
locationManager = CLLocationManager()
locationManager.delegate = self
locationManager.desiredAccuracy = kCLLocationAccuracyBest
locationManager.requestAlwaysAuthorization()
if CLLocationManager.locationServicesEnabled() {
//locationManager.startUpdatingHeading()
locationManager.startUpdatingLocation()
}
}
func locationManager(manager: CLLocationManager, didUpdateLocations locations: [CLLocation]) {
let userLocation:CLLocation = locations[0] as CLLocation
// Call stopUpdatingLocation() to stop listening for location updates,
// other wise this function will be called every time when user location changes.
//manager.stopUpdatingLocation()
let center = CLLocationCoordinate2D(latitude: userLocation.coordinate.latitude, longitude: userLocation.coordinate.longitude)
let region = MKCoordinateRegion(center: center, span: MKCoordinateSpan(latitudeDelta: 0.01, longitudeDelta: 0.01))
mapView.setRegion(region, animated: true)
// Drop a pin at user's Current Location
let myAnnotation: MKPointAnnotation = MKPointAnnotation()
myAnnotation.coordinate = CLLocationCoordinate2DMake(userLocation.coordinate.latitude, userLocation.coordinate.longitude);
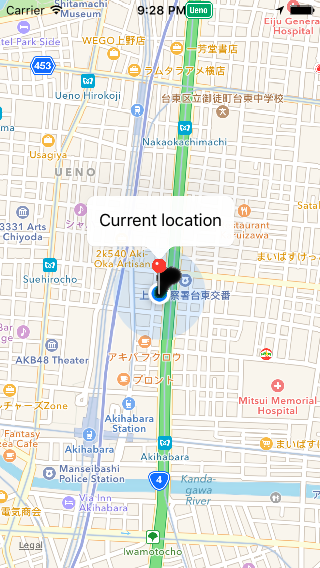
myAnnotation.title = "Current location"
mapView.addAnnotation(myAnnotation)
}
func locationManager(manager: CLLocationManager, didFailWithError error: NSError)
{
print("Error \(error)")
}
}
Video Tutorial
I hope that this short Swift programming tutorial was helpful for you. There is some much more to learn about mobile apps development with Swift for iOS platform! Check the video courses below and may be one of them will be just what you need.