In this tutorial, you will learn how to create an ActionSheet with three buttons in Swift.
UIAlertController.Style.actionSheet is a style of UIAlertController in UIKit that presents an action sheet to the user. An action sheet is a specific style of alert that appears in response to a control or action, and presents a set of two or more choices related to the current context.
Here are some key points about UIAlertController.Style.actionSheet:
- It’s used to present the user with a set of alternatives for how to proceed with a given task,
- You can also use this style to prompt the user to confirm a potentially dangerous action,
- The action sheet is displayed by the view controller that presented it,
- This style of alert slides in from the bottom edge of the screen.
By the end of this tutorial, you will have a working Swift code example that you can use in your mobile application.
Step 1: Create UIAlertController
To begin with, you’ll need to create an instance of UIAlertController. This is a class that manages alerts and action sheets for your app. In this case, you’re interested in an action sheet, which is a specific style of alert that presents the user with a set of two or more choices related to a single task.
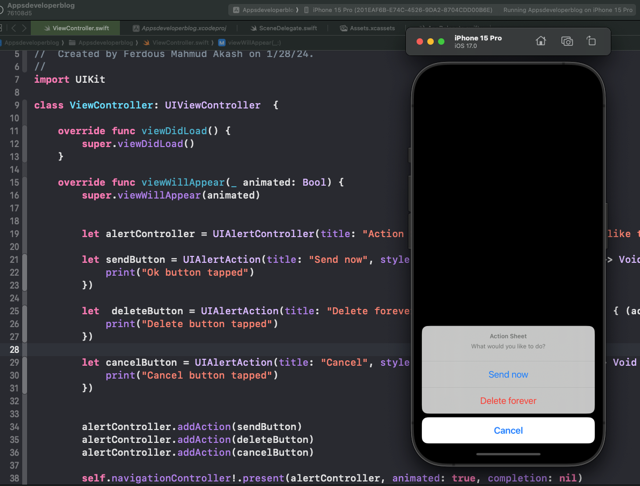
You initialize the UIAlertController with a title, a message, and the style .actionSheet. The title is “Action Sheet”, and the message is “What would you like to do?”. This setup is crucial for defining the context of the action sheet to the user.
let alertController = UIAlertController(title: "Action Sheet", message: "What would you like to do?", preferredStyle: .actionSheet)
Step 2: Create an OK button
Next, you’ll create an action for the “Send now” button. This is done using the UIAlertAction class. You specify the title of the button (“Send now”), its style (.default), and a handler that defines what happens when the button is tapped. In this case, the handler simply prints a message to the console.
let sendButton = UIAlertAction(title: "Send now", style: .default, handler: { (action) -> Void in
    print("Ok button tapped")
})
Step 3: Create a Cancel button
Similarly, you create a “Cancel” button. The style for this button is .cancel, which is a special style that indicates the button is used to cancel the action sheet. The handler for this button also prints a message to the console.
let cancelButton = UIAlertAction(title: "Cancel", style: .cancel, handler: { (action) -> Void in
    print("Cancel button tapped")
})
Step 4: Create a Delete button
The “Delete forever” button is created with a .destructive style. This style is used for actions that delete or remove something. The handler for this button prints a message to the console.
let deleteButton = UIAlertAction(title: "Delete forever", style: .destructive, handler: { (action) -> Void in
    print("Delete button tapped")
})
Step 5: Add Action Button to Alert Controller
After creating each button, you need to add them to the UIAlertController using the addAction method. This makes the buttons appear in the action sheet.
alertController.addAction(sendButton)
alertController.addAction(deleteButton)
alertController.addAction(cancelButton)
Step 6: Present Action Sheet to user
Finally, you present the action sheet to the user. This is typically done in response to a user action, such as tapping a button. Here, the action sheet is presented in the viewWillAppear method, which is called just before the view controller’s view appears on the screen.
self.navigationController!.present(alertController, animated: true, completion: nil)
Complete code example
Here’s the complete code using above steps combined together:
import UIKit

class ViewController: UIViewController {

    override func viewDidLoad() {
        super.viewDidLoad()
    }

    override func viewWillAppear(_ animated: Bool) {
        super.viewWillAppear(animated)

        let alertController = UIAlertController(title: "Action Sheet", message: "What would you like to do?", preferredStyle: .actionSheet)

        let sendButton = UIAlertAction(title: "Send now", style: .default, handler: { (action) -> Void in
            print("Ok button tapped")
        })

        let deleteButton = UIAlertAction(title: "Delete forever", style: .destructive, handler: { (action) -> Void in
            print("Delete button tapped")
        })

        let cancelButton = UIAlertAction(title: "Cancel", style: .cancel, handler: { (action) -> Void in
            print("Cancel button tapped")
        })

        alertController.addAction(sendButton)
        alertController.addAction(deleteButton)
        alertController.addAction(cancelButton)

        self.navigationController!.present(alertController, animated: true, completion: nil)
    }
}
Conclusion
I hope this tutorial was helpful for you. There are a lot more Swift code examples on this website if you check the Swift Code Examples page.
Additionally, you might also want to check a list of recent Swift tutorials where you will also find a list of useful resources for iOS mobile app developers.