In this blog post I am going to share with you how to create UIToolBar and UIBarButtonItem in Swift. I am going to use Xcode to create a Single View application and will position UIToolBar at the bottom of the view. I will then create three UIBarButtonItem(s) next to each other and will align first item to the left, second item in the middle and third item all the way to the right. I will also share with you how to create UIBarButtonItem programmatically and how to set UIBarButtonItem System icon using Swift code. To break it down in details the two video tutorials below will cover:
- Create UIToolBar,
- Create and position on UIToolBar three UIBarButtonItem(s),
- Assign each UIBarButtonItem a System Icon. I will set Play system icon on the middle button, Rewind icon on the on the left and Fast Forward icon on the button which is aligned to the right side,
- Make each UIBarButtonItem call a function when tapped,
- Change System Icon of UIBarButtonItem when button is tapped.
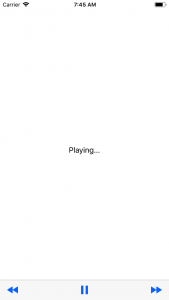
Here is how our application will look like:
Source code from the ViewController I will paste after the two videos below.
Create UIToolBar and UIBarButtonItems
Set UIBarButtonItem and a different System Icon Programmatically
Source Code
import UIKit

class ViewController: UIViewController {

    @IBOutlet weak var myToolBar: UIToolbar!
    var isPlaying = false

    @IBOutlet weak var buttonStatusLabel: UILabel!

    override func viewDidLoad() {
        super.viewDidLoad()
        // Do any additional setup after loading the view, typically from a nib.
    }

    override func didReceiveMemoryWarning() {
        super.didReceiveMemoryWarning()
        // Dispose of any resources that can be recreated.
    }

    @IBAction func rewindButtonTapped(_ sender: Any) {
        setOnPause()
        buttonStatusLabel.text="Rewinding..."
    }

    @IBAction func playButtonTapped(_ sender: Any) {

        if !isPlaying
        {
            setOnPlay()
        } else {
            setOnPause()
        }
    }

    @IBAction func fastForwardButtonTapped(_ sender: Any) {
        setOnPause()
        buttonStatusLabel.text="Fast forwarding..."
    }

    func setOnPause()
    {
        var items = self.myToolBar.items
        items![2] = UIBarButtonItem(barButtonSystemItem: UIBarButtonSystemItem.play, target: self, action: #selector(ViewController.playButtonTapped(_:)))
        isPlaying = false
        buttonStatusLabel.text = "On pause..."
        self.myToolBar.setItems(items, animated: true)
    }

    func setOnPlay()
    {
        var items = self.myToolBar.items
        items![2] = UIBarButtonItem(barButtonSystemItem: UIBarButtonSystemItem.pause, target: self, action: #selector(ViewController.playButtonTapped(_:)))
        isPlaying = true
        buttonStatusLabel.text = "Playing..."
        self.myToolBar.setItems(items, animated: true)
    }
}
And this is it! Please comment below if you have questions regarding this example.
I am trying my best to publish a new video tutorial every single week, so please do subscribe to this blog if you do not want to miss new and free weekly video tutorials. Because when I see there is a new subscribe 🙂 I get excited and motivated to create new code example in Swift more often.
Also, I have started creating tutorials on Java Web Services, Android, Kotlin and other tools that full stack mobile app developers use. You can check my new blog for full stack mobile app developers it already has plenty of very useful code examples, tutorials, books and video courses.
To learn more about mobile apps development for iOS with Swift checkout my page with great Resources for iOS Mobile App Developers or check out what is currently available on Swift below.
Happy learning Swift! 🙂
Building Mobile Apps for iOS with Swift – Video Courses